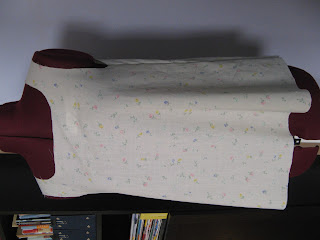
In the last post we finished drafting the pattern for a simple A-line sleeveless top. Now it's time to cut it from muslin, baste it, fit it, make necessary adjustments and transfer the adjustments back to the pattern. That will then be the final pattern ready to be made into a finished garment.
I cut the pattern out of a thrifted shirt - very inexpensive - and basted it to try the fit on the dress form. One IMPORTANT NOTE here: the pattern drafted this way, from the sloper will NOT INCLUDE seam allowances. If you want to have them included in the pattern you have to add them yourself. Personally, I don't like seam allowances to be included so all my patterns drafted this way will NOT include seam allowances.
In this particular case I added 1/2 in allowance only to shoulder and side seams because I am planning to put bias tape around the neck and arm openings, in which case I don't need seam allowances. The hemline... I am not adding any seam allowances here, they are not really necessary for the fitting phase, since I will not be hemming them. I just need to check the length and whether the hemline lies that way I want it too...
The fit was generally good: The neckline was lying flat (sometimes there could be a problem with wide or deep necklines, especially with wider shoulder seams with or without sleeves - we will cover that in designs in coming weeks...), arm openings were fitting well, the length was fine.. However, there were a few problems:
The biggest problem was that the top ended up very wide - the shoulders were fitting well, the problem was under arm - at the top of the side seam (as it turns out - the bust point falls at the same level as the top of the side seam, or the lowest point of the arm opening). Now, this might not be a problem if this were an oversized shirt with sleeves. But it does not work here. It should be loose enough to go easily over shoulders, but not too loose...
Also the middle of the front neckline was a little high, just a few millimeters, you can't even see it here...
The last two problems were easy - I just drew in the new necklines right on the "muslin". But the width... I was not sure why it ended up so big when in was drafted straight from the sloper which fits quite snuggly.
I think I figured it out though... If you draw a line parallel to the waistline (on the sloper) from the top of the side seam, or under arm (let's call it the bust line) you can see that it crosses almost all waist darts. By ignoring the waist darts we have added some fullness – in the front it comes to 0.7 cm (not much) but in the back it comes to almost 3 cm. Also, by moving the shoulder dart in the back (since it starts above the bust line) we added an extra 2.6 cm around the bust! So… we need to take some back!
So, with some trial and error, and basting a few times, I took 1.5cm in the front (at the underarm) and 2 cm in the back on both sides (so 3 cm from front and 4 cm from the back altogether). I took the same amount from the whole length of the side seam from the top to the hemline. If you want to top to flare more at the hemline, you can take in only at the top of the seam, underarm, but not at the hemline.
This is what it looked like after the alterations...
Much nicer and tighter fit.
Only one thing before we are ready to cut the fabric... We need to transfer all the modifications back to the pattern.
What I did here is basically just overlay the muslin pieces over the paper pattern and draw in the changes. In this case it involved redrawing the back (picture above) and front necklines, and redrawing the side seams. Since quite an amount was taken at the sideseams, I redrew the arm opening slightly, just to fix the curve:
If you enlarge the picture above, you can see the new lines drawn in I cut along those to get the final pattern (again, note that this pattern does NOT include seam allowances). That was used to cut the fabric and finish this top.
The finished item in the following post...
(let me tell you a little secret. i finished the top this evening, but it was too late to take pictures with natural light, so that will have to wait until tomorrow morning. but it makes me happy that I could finish the first challenge week within the time limit, if not exactly as fast as I hoped for)
To learn about drafting this pattern see the previous post.


No comments:
Post a Comment