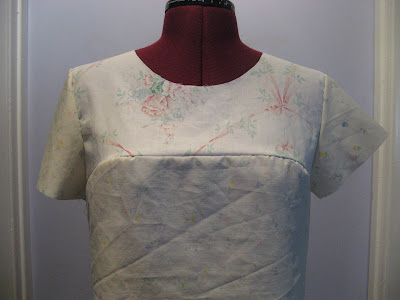
What other sleeve? Well, in the last post, I made a sleeve, a tighter sleeve (large sleeve cap). It fit very well, but it wasn't really the look that I wanted. So I tried drafting a different sleeve, with a short sleeve cap - my guess is that this kind of a sleeve will be closer to my sketch of the Faros tunic: shorter, wider, sitting father from the bodice.
To start, draw two orthogonal lines (intersecting at A) and trace the arm openings for the front and back patterns (details in the previous post). Then, mark points 1 and 2 and find point B half way between 1 and 2. Measure distance from A to B and mark point C half way between A and B. A to C is now the sleeve cap height.
A sleeve with the small sleeve cap is wider (often used for loose fitting shirts) and therefore does not need any ease. Therefore, the length of the sleeve cap curve needs to be about the same length as the arm opening curve. So, the next step is to draw a line from C to the horizontal line - the length of the line C3 is BAL (back arm curve length) - 0.5 cm because there will be no ease (in the previous post, the length was BAL + 1 cm because we needed to add ease).
Same in the front - C4 line length is FAL (front arm curve length) - 0.5 cm. (for details on this go to previous post)
Next, we need to draw how much the sleeve curve will go above these lines we just drew. So, mark 1/4 of FAL and 1/4 BAL from C on C4 and C3 lines respectively. At those points draw a perpendicular line 1 cm long. This is where the sleeve curve will be at the highest above C3 and C4.
Now, you can draw the curve: in the back it will cross the C3 line at about 1/3 of C3 length, measured from point 3. It is quite shallow below C3 line, maybe 0.3 cm.
In the front, point E is half way between C and 4. The sleeve curve will cross C4 line about 2 cm below E. The bottom part of the curve here as a little deeper than in the back, maybe 0.5 - 0.7 cm.
The last thing - add the length: in this case I added 3 cm - same as with the first sleeve. One last thing to do here is to mark alignment points between front/back patterns and the sleeve pattern. I will not repeat this method here - see previous post for details. I actually did not have to redraw the points on the back/front patterns, because they are the same. All I had to do is transfer them to the sleeve pattern. The only difference between this and the first sleeve is that here there is no ease, so curve length AE = 4E1, ED = E1D1, DC = D1C in the front, and AF = 3F1, FB = F1B1 and BC = B1C in the back. When you think about it... you don't really need the alignment marks, but in case the curves are not exactly the same, you will know how to match the sleeve to the bodice.
Just for comparison... you can see that the sleeve cap is quite shorter on the second sleeve. And you can see how the much wider the second sleeve is. Now we'll see how it fits...
Fits very well. Nothing more to say, really.
What is interesting though, is the comparison of the two sleeves. You can see that the tight sleeve (on the left) seems longer (even though we added 3 cm in both cases, below the "bust point" or the widest part of the sleeve cap). Also, the drape is quite obviously different - while the tight sleeve falls close to the body, the wide one (on the right) sticks out more (giving the arm more room).
I am going to go with sleeve 2.0... it just fits the design better. We'll see the finished top next...
Previous Challenge 7 posts:
Challenge 7:: Faros tunic
Challenge 7:: Faros tunic: drafting everything except the sleeve + muslin
Challenge 7:: Faros tunic
Challenge 7:: Faros tunic: drafting everything except the sleeve + muslin


That is an interesting comparison of sleeves. I have made a men's shirt where the sleeve stuck out sideways too much. I had thought that the next time I made it I would raise the sleeve cap. Your example confirms this for me.
ReplyDeleteHi, in the textbook they wrote "front AH/4" both for front and back, but you calculated "1/4 BAL from C on C3" which should be "1/4 FAL from C on C3 (back)". So, was it a mistake in the book, although they write it twice, one in the figure and second in the text. Did you find it out and corrected it already with your version stated in this post?
ReplyDelete