This time I will separate drafting instructions for front and back into two separate posts, in order to keep them shorter. So, the front...
Similar to Week 1 challenge, we will start from the bodice pattern. In order to get the fullness around the neckline, we need to move the dart into the neckline. This will keep the fit and form while changing the design of our pattern. We will also add some more fullness into the neckline and add some length.
To move the dart and add fullness, we need to cut up the bodice pattern, so the first step is to copy it on a separate piece of paper. Make sure you copy the bust dart; you can ignore the waist darts. Again, they will be blended into the design. Before I cut out the copy of the front I also opened the neckline a bit - I too 2.5 cm at the shoulder and 3 cm at the front (completely arbitrary - I put the bodice on the dress form and draw where I want these point to be, then I measure).
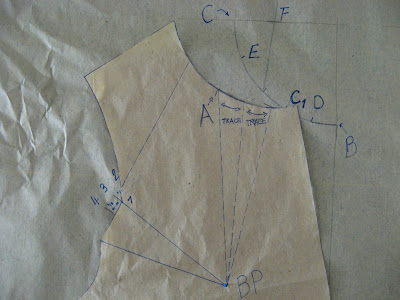
After the front is cut out, find the neckline midpoint (A) and mark the line from BP to A - this is the new position of the bust dart.
If we were making a neckline dart, all we would have to do at this point is move the dart into this position (similar to what we did in Week 1). However, since we will change the dart into gathers, we need to distribute the dart along the neckline. To do that, divide AB into 3 segments (about equal), mark points D and C1 and draw lines from BP to C1 and BP to D.
I mentioned that we need to add a bit more volume to the front - to get more gather - the more volume you add, the more gather you get. I choose not to do too much, so I will mark only one more place - point E which is halfway from A to C. If you want more gather, you can mark more points between A and C, even between B and D. The line from E to the arm opening can be drawn in different ways, here I decided to have extend from F through E. You can also draw it perpendicular to neckline.
Finally, since we are distributing the dart into 3 places (points A, C1 and D) we need to divide the dart into 3 equal pieces: mark points 1, 2, 3 and 4 as below.
Now we are ready to pivot. But first trace the pattern from waistline, to point B (the whole midline) and then to point D. Put a pin in BP and rotate the pattern counterclockwise until points 1 (on the pattern) and 2 meet. Trace from D to C1 (see below).
Then rotate some more, until 1 and 3 meet and trace between points C1 and A.
Finally, rotate until 1 and 4 meet, and trace from A to E.
This is what you will have at this point... (I just drew the dashed lines to make it more clear at what you are looking at)
Almost done. Cut along the line from point E to the edge, but leave a bit so that the shoulder piece stays attached to the pattern. Move the shoulder part away a bit - I opened it approximately the same amount as the three parts of the dart. Trace from E to shoulder, along the shoulder seam and along the arm opening to point 1.
The last step. Rotate back clockwise until 1 on the pattern is back at one on the paper and trace from 4 all the way to side seam and then down the side seam to the waistline.
When you move the bodice pattern away, this is what you have. I forgot... add length from the waistline - in this case I added 10 cm.
Just for illustration purposes, I cut out the original bust dart from the bodice and overlayed all the pieces over the final drawing (previous picture). See, fits perfectly.
OK, I lied. A little bit. This is actually the final step. Find and mark midpoints of the sections you traced before (around the neckline) and connect them to smooth out the neckline curve.
That's it. Cut the pattern out and you are ready to work on the back...
Previous posts:


thank you! Great tutorial!
ReplyDelete