Showing posts with label gathers. Show all posts

11/1/11

Week 6:: Kioko blouse: drafting and muslin - Part 2

Hello! It's been a while. It's just been one of those weeks... unplanned meetings (waste of time, but that's a whole different post), Halloween preparations, a short out of town trip (which was very, very nice), feeling a little bit under the weather (which means a bit more resting, a little less work)... you get the picture.

Which made me think, to 'rethink' the idea of week challenges. With the designs getting a more difficult to draft and more complicated to sew, weekly challenges, could be just a bit too... challenging. Thinking I could do them in a week might have been a bit too optimistic. I will still do the challenges, but instead of trying to kill myself and complete them in a week, I will give myself two weeks. I will have to change the titles too... work in progress, right.

But let's not waste any more time and go back to this top... In this post I will show you the minor changes I made to the pattern I made last week and all the other modifications I made to finish the design...


Step 1: Shorten sleeves. First things first. I thought the sleeves were a bit too long, so I shortened them by 2.5 cm. Make sure you draw a line parallel to the sleeve opening (the front is not a straight line). I did not throw these away - I will reuse them later for a pattern for a band around the arm opening.


Step 2: Tighten neckline. The neck was gaping a bit - because it was so deep. So, to tighten it and make it lie flat against the chest, measure 8 cm from the bottom of the V-neck (I measured that on the dress form) and then draw a line from BP to the neckline at that point. That will be the "bottom" leg of the dart we are drawing. The "top" leg is about 0.5 cm from the "bottom" measured at the neckline. Now we need to close that dart and move it to the waist. Therefore, cut that little dart we just drew. And cut from BP (but not through BP) down to the waistline. Close and tape the neck dart and open the waist dart (I put some paper under the pattern and taped it). Also, don't forget to smooth the neckline.


Step 3: The yoke. I decided to do a yoke, after I decided to do the shoulder gathers. I just thought gathers would not look so good coming from the shoulder seam - too high. OK, so, put the front and back together at the shoulder (tape together) and then draw the back yokeline about 7.5 cm down from the back neck, parallel to the hem (or waistline). The front yokeline should be parallel to the shoulder seam, 3 cm down. One more thing to do here... as I was learning about kimono and french sleeves, I noticed than in all of the variations of those, the shoulder seam is lowered a bit away from the neck. I am guessing to remove the bulk at the shoulder. The sleeve is wide enough, no need for the extra fabric. Well, I couldn't do that at the shoulder seam because of the yoke, but I can do it at the yokeline. See the second pic above. Measure 2 cm down from the yokeline at the arm opening and smooth the seam down from the original arm opening from the sloper (see the red lines). Do not cut the yoke out yet.


Step 4: Shorthen arm band. If you are not going to be doing bands on the arm openings, you can skip this step. Otherwise, we have to shorten the bands by the same amount we took at the yokeline in the previous step. Tape the bands together at the shoulder, and put them against the font and back patterns from the last step. Draw the lines on the bands at yokelines and the new lowered seams. Fold the bands at these lines and tape.


Step 5: Prepare for moving waist dart into shoulder seam. In first picture above you can see I outlined the waist dart (ignore the red lines inside). The waist dart was created in previous steps when we moved the bust dart and later the neck dart. This will now be moved into the shoulder (actually yokline). Mark point 1 at the midpoint of the sloper shoulder and points 2 and 3, 2.0 cm on each side of 1. Draw lines from BP to points 1, 2 and 3.


One more thing... mark the gather points (the stars in the pic above) about 1.0 cm from points 2 and 3. Then, match the gather points at the yoke.


Step 6: Move the dart. Cut out the waist dart, close and tape. Cut along the three lines from yokeline to BP. Spread them equally and tape on paper (see second pic above). Smooth the yokeline.


Step 7: Draw the high waist line on front. This one is going to go from the tip of the V-neck, under the bust and to the sideseam at the notch we drew in in the previous post (it's 10.5 cm down the sideseam from underarm). I did this without measuring. The point under BP I choose (eyeballed) to be 7.5 cm under BP. Then I connected the three points with straight lines. No need for curves, I hoped.


Step 8: Add length. Use extra paper and add length to the front and back patterns. I wanted this fairly long so I added 27 cm from the waistline. Since we will be adding some flair too, divide the width of the front and back in 4 pieces. Draw the lines from the high waist to the hem. Cut along the high waist line.


Step 9: Add flare. Do this for both back and front (pictured for front only). Cut along the three lines from hem to the top (but not through). Spread to add flare as you wish. I added 2 cm at each line - 6 cm in all. 

That's it. I forgot to picture all the pattern pieces together, but you will have: the yoke, back and front top, back and front bottom, and arm band. You will also need facing at the neckline.

Here is muslin (don't let the pattern distract you! also, excuse the flare, it was so bright, I had to photograph in shade but against the sun).I did not cut the armbands.


Overall, it was good. The sleeves look good, the drape is fine, from front, side and back.


The neck fits very well, no gaping. And the gathers look fine too.


The only problem was that it looked too wide under the bust, at the high waist seamline. But I couldn't take in any more, because this is supposed to go over head. So I decided to go with some elastic in the seam. 


So no pattern modifications... we'll see how it turns out.

Previous Week 6 posts:
Week 6:: Kioko blouse
Week 6:: Kioko blouse: drafting and muslin - Part 1

10/19/11

Week 5:: Lez Top: drafting front

This one was too hard to describe, so I will try with a name. Lez top. Sleeveless top, cut under the bust, with gathers instead of the bust dart. Here is the inspiration:


(This is from a book - Sewing Recipe - I recently bought and find very helpful for sewing tips and techniques).

Before we start drafting the front let me come clean about something... I already made this top. A few months ago. You can see the whole project here. However, I started from a different pattern, not the sloper like I will do here, so the steps will be different. I am doing this because I need some time to create e-patterns for Weeks 1 through 4. The plan was to create them in one size and post for you to download and try.

OK, lets start. First, copy the front sloper:


This part is the same as in Week 4 challenge so you can look there (step 3 and step 7) for details. Draw in a new shoulder seam: A to A1 is 4.5 cm, and A1 to B1 is 5 cm. Draw in a new neckline - in this case, same as Week 4, I did a deep neckline - point C is 13.5 cm down the midline. Also, draw points D and D1. First square down from A and to the left from C. Draw a line from the intersection of those two and BP until it intersects neckline. That's D. D1 is about 0.5 cm away from D along the neckline. These two are needed to tighten a deep neckline. If your neckline is not deep, you can omit D and D1.


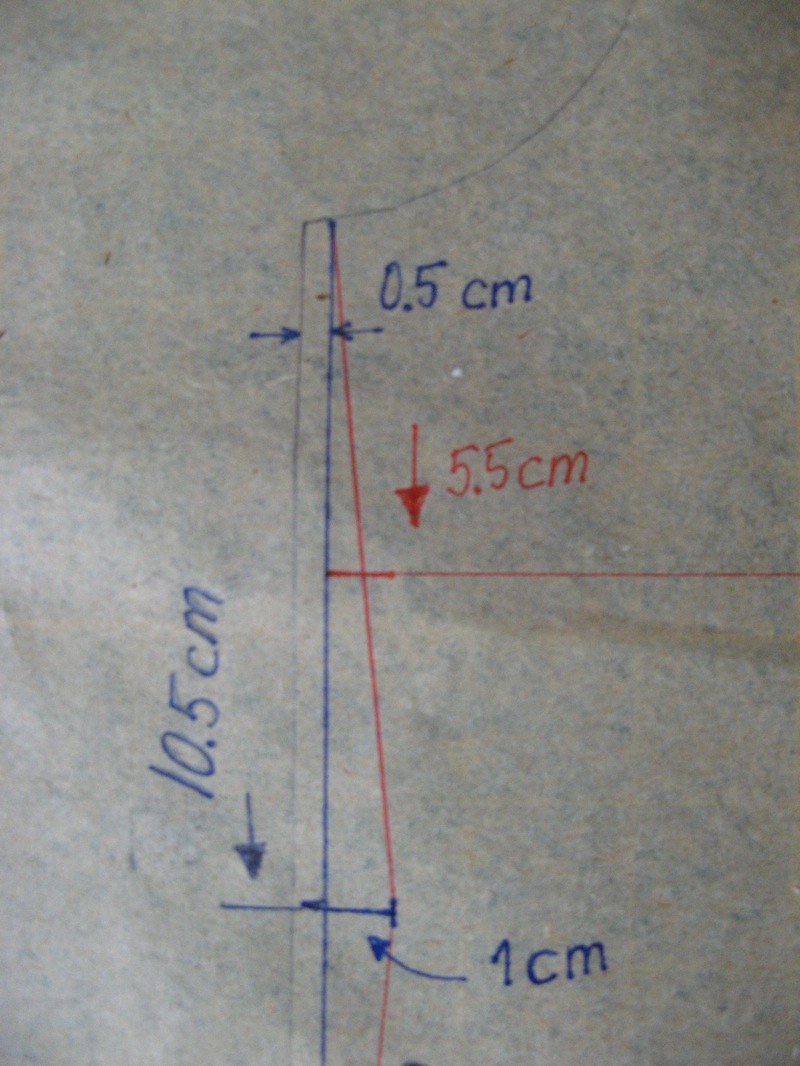
Now let's move on to the sideseam. First take in 0.5 cm (blue line parallel to the original side seam). Then draw a notch on the new side seam 10.5 cm down. Extend the notch 1 cm in - this is just for shaping. Similar as in Week 4 challenge. Draw the new side seam (in red) from the top of the side seam, to the notch and then down to the hem line (where you put the hemline is arbitrary, in my case it is 20 cm down from the waistline). I added a bit of room at the hem - just about 1 cm from the original side seam).


The last thing to do is draw in the line where we cut the front pattern into top and bottom part. This line (empire waist maybe, or a bit higher? I wanted it to be just under the bust) is about 5.5 cm down the side seam (red horizontal line). Notice that we have not moved the dart yet. This is because it will be moved only into the top part of the front pattern. Now cut the pattern out and then cut along the red horizontal line to separate the bottom and top part of the front pattern. The bottom stays as is, no more modifications on it. We have a few more things to do at the top...


Draw in a line from BP straight down to the bottom.


Then cut out the bust dart and the little triangle between BP, D and D1. Also, cut along the line down from BP. That's where we will move the dart to, and the extra volume from the neck (D - D1). Cut almost all the way to BP, but not through. This way the three pieces stay together at BP.


Now close the bust dart and the the D-D1 "dart" and open under BP. Trace all around.


Draw in the new armhole, smooth the neckline, and connect and smooth the new dart. This will not be sewn in as a dart, instead we will use gathers. Gathers will extend beyond the dart - in this case the * are placed 3 cm to the right and left of the dart legs. Gather between those two points. Cut this out and you have a finished front. Two pieces:


Tomorrow the back...

10/5/11

Week 3:: Sleeveless top with neckline gathers: fitting and pattern modification

This is going to be a short post...
Again, I cut the pattern out from a sheet (this is probably the fourth or fifth one I cut from the same sheet. And I still have some left over. It cost $1.00.). Remember to add seam allowances if you create patterns with this method, because bodice patterns do NOT include seam allowances. In this case I used 1/2 in seam allowances on side and shoulder seams only. No seam allowances on neck and arm because I wanted to see what then would fit like when finished.

Before gathering...


After gathering.


Very nice, no? I was a bit skeptical about the neckline - when I blended the curve it looked a bit "wonky". But it looks very good with gathers.

I cannot see any problems with this - fits nicely in the front, in the bust section, and in the back. It is not too wide or too narrow. The only thing I will change is too widen the neck by 1 cm back and front (I tried it, and it was a little snug going over my head).

I know I am three garments into this project, but for now, It seems that no major modifications are needed once the pattern is drawn from the basic bodice. This is good, because that's exactly what I was hoping for. If you draw your own bodice, spend some time fitting it, you will be able to create designs that will too fit well. We'll see how it goes from now on...

Finally, let's finish this up...

Previous posts:


Week 3:: Sleeveless top with neckline gathers: drafting back

The back will be a bit less complicated. I promise.

Again, start by copying the back bodice and draw a new neckline.


Similar to the front, to add gathers around the neck we will move the shoulder dart into the neck and also add some volume around the neck. First, to move the dart, find A, which is at at the middle of the neckline. Draw a line from A to tip of shoulder dart.  Also, find B and C halfway from A to ends of neckline. 


Before we move the dart, trace from B to midline and then along the midline to the waistline. Also draw lines from B and C (for adding fullness) perpendicular to neckline.


This step should have been done before the lines we drawn, but OK. It will work. Cut out the shoulder dart, cut along the line from A to tip of shoulder dart and move that little piece of paper clockwise around the tip of the dart until you close the shoulder dart. This will open a new dart at neckline. Redraw the line from C.


Cut along lines from B and C until the edge but not through, so that pieces don't separate. Keeping the midline in place, open the pattern along cut lines by a desired amount. The more you open, the more gather you will get. I opened about the same amount (at neckline) as the moved dart. Trace along all the edges.


And this is what you get... (you don't need to trace along the cut lines, I did that only for illustration purposes).


Mark midpoints on traced edges along the neckline and connect them to blend the neckline curve.


That's it. Oh, don't forget the add length from waistline (I added 10 cm).


Just to make sure the neckline and arm opening curves are still smooth from back to front, align pattern pieces along the shoulder seam. Looks good.


And this is what the patterns look like. Now on to muslin...

Previous posts:

Week 3:: Sleeveless top with neckline gathers: drafting front

As a reminder we are drafting something like this...


This time I will separate drafting instructions for front and back into two separate posts, in order to keep them shorter. So, the front...

Similar to Week 1 challenge, we will start from the bodice pattern. In order to get the fullness around the neckline, we need to move the dart into the neckline. This will keep the fit and form while changing the design of our pattern. We will also add some more fullness into the neckline and add some length.

To move the dart and add fullness, we need to cut up the bodice pattern, so the first step is to copy it on a separate piece of paper. Make sure you copy the bust dart; you can ignore the waist darts. Again, they will be blended into the design. Before I cut out the copy of the front I also opened the neckline a bit - I too 2.5 cm at the shoulder and 3 cm at the front (completely arbitrary - I put the bodice on the dress form and draw where I want these point to be, then I measure).


After the front is cut out, find the neckline midpoint (A) and mark the line from BP to A -  this is the new position of the bust dart.


If we were making a neckline dart, all we would have to do at this point is move the dart into this position (similar to what we did in Week 1). However, since we will change the dart into gathers, we need to distribute the dart along the neckline. To do that, divide AB into 3 segments (about equal), mark points D and C1 and draw lines from BP to C1 and BP to D.


I mentioned that we need to add a bit more volume to the front - to get more gather - the more volume you add, the more gather you get. I choose not to do too much, so I will mark only one more place - point E which is halfway from A to C. If you want more gather, you can mark more points between A and C, even between B and D. The line from E to the arm opening can be drawn in different ways, here I decided to have extend from F through E. You can also draw it perpendicular to neckline. 


Finally, since we are distributing the dart into 3 places (points A, C1 and D) we need to divide the dart into 3 equal pieces: mark points 1, 2, 3 and 4 as below.


Now we are ready to pivot. But first trace the pattern from waistline, to point B (the whole midline) and then to point D. Put a pin in BP and rotate the pattern counterclockwise until points 1 (on the pattern) and 2 meet. Trace from D to C1 (see below).


Then rotate some more, until 1 and 3 meet and trace between points C1 and A.


Finally, rotate until 1 and 4 meet, and trace from A to E.


This is what you will have at this point... (I just drew the dashed lines to make it more clear at what you are looking at)


Almost done. Cut along the line from point E to the edge, but leave a bit so that the shoulder piece stays attached to the pattern. Move the shoulder part away a bit - I opened it approximately the same amount as the three parts of the dart. Trace from E to shoulder, along the shoulder seam and along the arm opening to point 1.


The last step. Rotate back clockwise until 1 on the pattern is back at one on the paper and trace from 4 all the way to side seam and then down the side seam to the waistline.


When you move the bodice pattern away, this is what you have. I forgot... add length from the waistline - in this case I added 10 cm. 


Just for illustration purposes, I cut out the original bust dart from the bodice and overlayed all the pieces over the final drawing (previous picture). See, fits perfectly. 


OK, I lied. A little bit. This is actually the final step. Find and mark midpoints of the sections you traced before (around the neckline) and connect them to smooth out the neckline curve.


That's it. Cut the pattern out and you are ready to work on the back...

Previous posts: