Showing posts with label sleeveless. Show all posts

1/25/12

Challenge 9:: Ulla top:: intro and drafting


And we are BACK! 

It's been a while, more than a month! I will say it - I can't believe it's been that long. First it was the winter vacation, most of which we were away. Then I took a week to finish a project I had lying around. Then I worked on this e-pattern. Then... last week just flew by with doctor and dentist appointments. Then... a stomach flu. Then... it's Jan 25. 

But we are back, and trying to stay on track - one/two weeks for a new garment. This week we are not really going to be making a new garment - it will be the basic sleeveless top already made in Week 4. However I will use the e-pattern I posted last week: the block I will be using to make the next few designs. You can read about it and download it here. Therefore, it will basically be the same top, except that it will be easier to make because I will not be starting from the basic sloper, I will be starting from a block I designed myself, and therefore there will be less steps to get to the final design.

The best thing is that now you can download that block, follow the instruction here and sew a top like this for yourself. The block comes in sizes 36 - 42 (based on burda sizes; see the size chart).

OK, so just to show how this will work, I decided to redo the basic sleeveless top. And now it finally has a name: Ulla top. As a reminder... this is what it should look like:


This is what the pattern looks like when it is printed and assembled. You can of course print it black/white because the pattern lines are different so you will be able to figure out which size is which. 


Once you cut your size, you will have the front and back pieces like these:


If you compare these pattern pieces with those of the finished basic sleeveless top - you could see that they are very similar. The biggest difference are the arm and neck openings, and that's what we are going to be changing to get this and some other designs.


To start, redraw the new neckline and arm opening. I used the same measurements as before: 4.5 cm from the neckline down the shoulder seam (both front and back); 5 cm shoulder width. In the back you will notice I did not measure 5 cm for the shoulder - because of the dart - instead I measured from the arm opening, 3.2 cm to match the same measurement in the front. The front neck opening is 13.5 cm deep; back neck is 6 cm.


Before I cut those out, I need to check if the curves are smooth across the neck and arm openings. Align the pattern pieces as in the pics above: as you can see - the arm curve is nice and smooth, but the neck curve needs to be fixed a little, it is not smooth across the shoulder seam. Now you are ready to cut along those lines.


Next, we need to fix the neck opening a little: because this is a deep opening, it will not lay flat on your chest. So we need to tightened it a bit, which will bring the shoulder seam closer to the neck. If you choose to make a smaller opening you might not have to do this. It is hard to say what is the deep neckline and what is not, or whether you need this or not. The best thing is just to try on your muslin. One note - if you are making a sleeveless top, like this one, tightening your neckline will not matter much, because there are no sleeves to be pulled up as the shoulder are pulled closer to the neck, so you can do it, even if your neckline is not as deep as this one.

To tighten... draw a line from the Breast Point (BP: make sure you select the one for your size) towards the neckline, at about 1/3 of the length of the neckline from the middle line. Then measure 5 mm down the neckline - towards the midline - and draw another line from BP to this point. Now you have a little dart from the BP to the neckline. Now we have to remove this dart...


There are a few options as to where to "move" that "dart". In this case I chose to add a bit volume at the bottom, make it even more A-line, so I moved the dart towards the hem. So I drew a line perpendicular to hem from BP. Then cut the dart out and then cut along the line from hem to BP, but don't cut through BP, stop just before so that the two pieces don't separate. Close the dart and open at the hem, just like above. Tape the closed dart together and tape some paper under the open part to stabilize the pattern - you could leave it open but you would have hard time transferring it to your fabric. The front is almost done - the last thing is to smooth the neckline, if you need. Depending on your curve, when you close the dart you might need to redraw it slightly.


Finally the back... The only thing to do is to take care of that shoulder dart. Again, there are a few options, and I will show some in future projects. But in this one I decided to move it into the hemline, to add some volume, just line in the front piece. So, again, draw a line straight down to hem from the tip of the dart. Then cut the dart out and cut along the line from the hem to, but not through, the tip of the dart. We will not move/close the whole dart because this will add too much volume to the bottom, and that would not match the front. So I measured the amount added in the front by moving the neckline dart - it was about 2 cm, and opened the back about the same amount (so that the opening measured at the hem is about the same). This means that the shoulder dart will not be completely closed. And that's OK. The little bit extra will not be a problem - I will just do a little ease... Put some paper under your pattern and tape down.

We now have a finished pattern and we can do the muslin...

10/21/11

Week 5:: Lez Top: drafting back

The back will be the same as the Week 4, basic sleeveless top. The only difference is the amount taken in at the side seam and shaping of the side seam. Here are the steps:


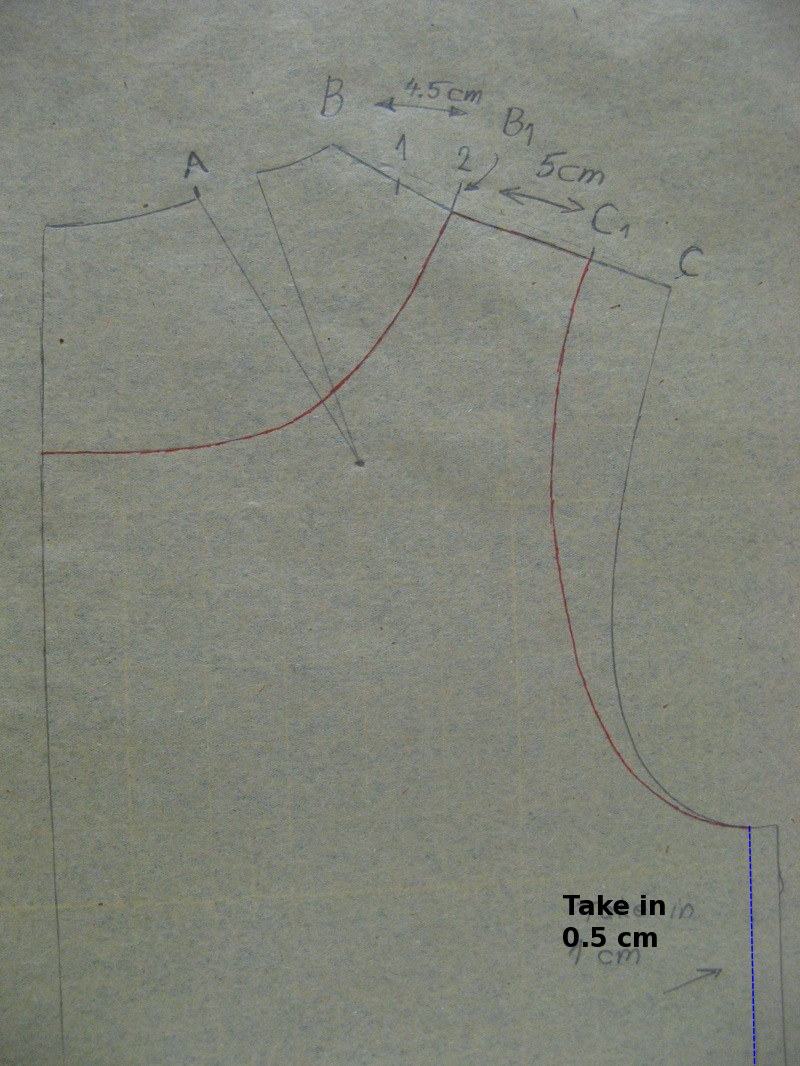
Step 1: start with the sloper. Mark point A about 1/3 of of the neckline from the shoulder. Trace from A to midline, down midline and along the hem (waistline). Mark points 1 and 2 and trace from 2 along the shoulder line.


Step 2: put a pin into the tip of the shoulder dart and rotate the bodice clockwise until point 1 matches point 2 (basically closing the dart). Trace from A (point A on the bodice, see below) toward the shoulder and down the shoulder to point 2.


This is what you should have at this point.


Step 3: Draw new shoulder: B to B1 is 4.5 cm; B1 to C1 is 5 cm. Draw a new neckline and arm opening. Take in 0.5 cm at the side seam. Draw a new sideseam parallel to the original (blue line on the pic above).


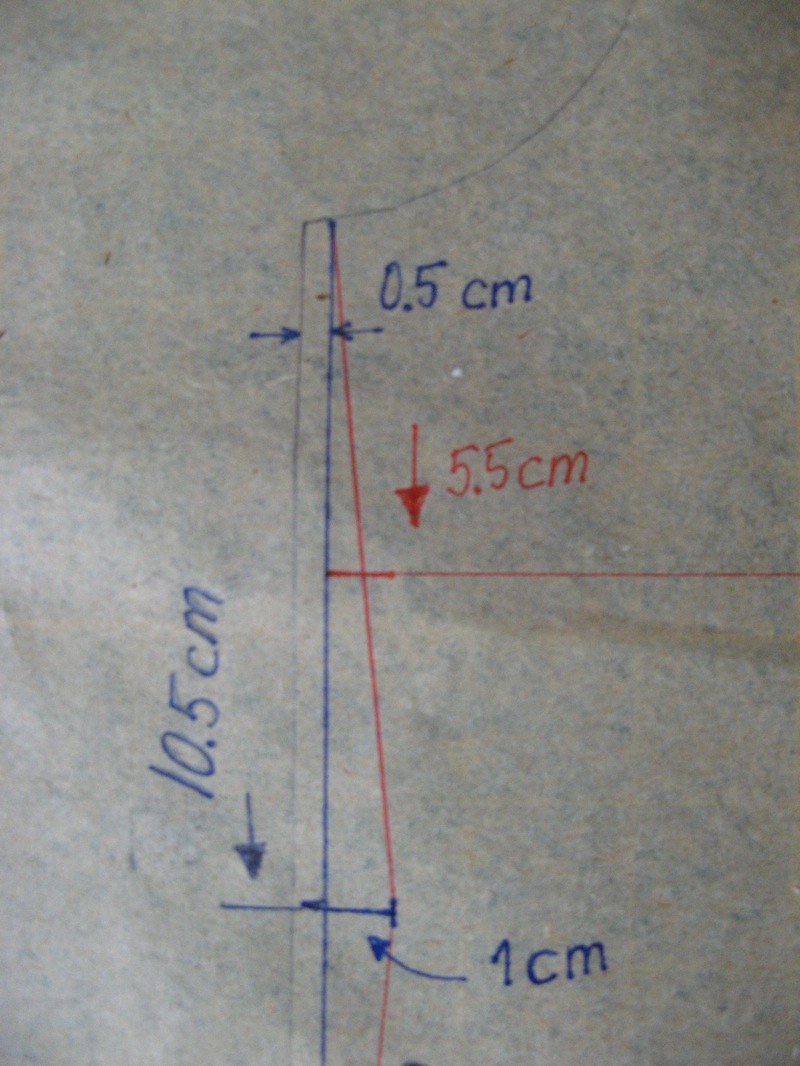
Step 4. Add length (I added 20 cm from the waistline (just extending the sideseam and the midline by 20 cm). Now let's shape the sideseam. Draw a notch on the new side seam 10.5 cm down. Extend the notch 1 cm in - this is just for shaping. Draw the new side seam (in red) from the top of the side seam, to the notch and then down to the hem line. I added a bit of room at the hem - just about 1 cm from the original side seam).


Step 5: taking care of the leftover dart at the neckline. I drew a deep neckline, but there is still a bit of shoulder dart left - about 0.5 cm. Instead of drawing in the dart and having it as a part of the pattern (and having to sew it), I redrew the shoulder seam, taking down point B1 about 0.5 cm along the neckline.


Step 6: make sure that the neck and arm curves are smooth over shoulder seams. Put front and back together at the shoulder seam and check. In this case I had to smooth a little bit (see blue line above).

That's it. Next is the finished top...

Previous Posts:

10/19/11

Week 5:: Lez Top: drafting front

This one was too hard to describe, so I will try with a name. Lez top. Sleeveless top, cut under the bust, with gathers instead of the bust dart. Here is the inspiration:


(This is from a book - Sewing Recipe - I recently bought and find very helpful for sewing tips and techniques).

Before we start drafting the front let me come clean about something... I already made this top. A few months ago. You can see the whole project here. However, I started from a different pattern, not the sloper like I will do here, so the steps will be different. I am doing this because I need some time to create e-patterns for Weeks 1 through 4. The plan was to create them in one size and post for you to download and try.

OK, lets start. First, copy the front sloper:


This part is the same as in Week 4 challenge so you can look there (step 3 and step 7) for details. Draw in a new shoulder seam: A to A1 is 4.5 cm, and A1 to B1 is 5 cm. Draw in a new neckline - in this case, same as Week 4, I did a deep neckline - point C is 13.5 cm down the midline. Also, draw points D and D1. First square down from A and to the left from C. Draw a line from the intersection of those two and BP until it intersects neckline. That's D. D1 is about 0.5 cm away from D along the neckline. These two are needed to tighten a deep neckline. If your neckline is not deep, you can omit D and D1.


Now let's move on to the sideseam. First take in 0.5 cm (blue line parallel to the original side seam). Then draw a notch on the new side seam 10.5 cm down. Extend the notch 1 cm in - this is just for shaping. Similar as in Week 4 challenge. Draw the new side seam (in red) from the top of the side seam, to the notch and then down to the hem line (where you put the hemline is arbitrary, in my case it is 20 cm down from the waistline). I added a bit of room at the hem - just about 1 cm from the original side seam).


The last thing to do is draw in the line where we cut the front pattern into top and bottom part. This line (empire waist maybe, or a bit higher? I wanted it to be just under the bust) is about 5.5 cm down the side seam (red horizontal line). Notice that we have not moved the dart yet. This is because it will be moved only into the top part of the front pattern. Now cut the pattern out and then cut along the red horizontal line to separate the bottom and top part of the front pattern. The bottom stays as is, no more modifications on it. We have a few more things to do at the top...


Draw in a line from BP straight down to the bottom.


Then cut out the bust dart and the little triangle between BP, D and D1. Also, cut along the line down from BP. That's where we will move the dart to, and the extra volume from the neck (D - D1). Cut almost all the way to BP, but not through. This way the three pieces stay together at BP.


Now close the bust dart and the the D-D1 "dart" and open under BP. Trace all around.


Draw in the new armhole, smooth the neckline, and connect and smooth the new dart. This will not be sewn in as a dart, instead we will use gathers. Gathers will extend beyond the dart - in this case the * are placed 3 cm to the right and left of the dart legs. Gather between those two points. Cut this out and you have a finished front. Two pieces:


Tomorrow the back...

10/14/11

Week 4:: basic sleeveless top: fitting and pattern modifications

My plan was to do these 'fitting and pattern modifications' posts by Thursday so I would have Friday to finish up... But this time, completely unexpectedly, fitting and pattern modifications took long, very long. At one point, yesterday, I was completely stumped; I thought I would not be able to figure out what what going on...

Let's start from the beginning...

I cut out both Version 1 and Version 2, just for comparison... Just as a reminder - Version 1 had a wider bust dart, Version 2 was a little wider at the hem - these differences were due to different dart manipulations, see previous posts for details).

First surprise was that Version 1 actually fit better (without any modifications). I expected the dart to be too pointy. And both were too wide - even with that 1 cm I took in on the sides of both front and back. But one thing was good - the neckline lay flat, no gaping.

Version 1
Version 2
The biggest problem were those darts. May I remind you I have no experience drafting... except for these past few weeks... But I was expecting a smaller, shorter dart for have a better, smoother, flatter fit with no wierdness in draping. But I was very wrong, just look:

Version 1 
Version 2

(At this point I will no longer talk about Version 1. I chose to go go with Version 2 and the following pics and text refer only to Version 2).
If you click on the Version 2 pic, you can see that the dart seems to be 'pointing' in the wrong direction, and the drape is all wrong which you can see in both the side and front view above.

At this point I took the muslin off, and started making changes - to the dart, taking more of side seam in... taking in at the shoulders... but nothing worked. Here is where I felt stumped. What is going on? Where is the problem?

The first problem I found was not a problem with the pattern, the problem was in how I was transferring the pattern onto fabric. I missed the tip of the dart. No wonder it was pointing away from the BP. But that still did not fix the problem. I tried making it even shorter. No. I tried making it a little longer. No.

Then I took out the bodice I made a few weeks back, and put the muslin over it. I thought it would help me see better where the problems were. And it did, especially with the dart since it was now easy to see where BP was. Then I sewed the dart all the way to BP, no shortening. And I added more on the sides. And finally I had something I liked. (there were so many steps, so many changes, I could not take pictures of all)


On your left is the side with the modifications I mentioned above. The right side is without modifications. Here are the closeups:


This one fits very nice, and even though the dart is closed all the way to BP, it is not too pointy, it actually makes the side of this top drape very nicely.


But the shortened dart... Even though I fixed it's position, and it was pointing the right way, the fit was all wrong. Can you see it? It seems it would better fit a bigger bust. I still don't know why this is? 

Anyway... I was happy with the fit so I transferred the changes onto the paper pattern. The side seam - I took 1.5 cm at "high waist" about 10.5 cm down the side seam, then connected that to the top and bottom of side seam. It has more of an A-line than my original idea, but I liked the way it turned out, so that's the way I am going to leave it...


And now onto the finished top...

10/10/11

Week 4:: basic sleeveless top

BurdaStyle Magazine 05/2011
BurdaStyle Magazine 08/2011
Maybe I should have started with this top, or at least do it before the last one (neck gathers), since it is easier? But I believe a basic sleeveless top is important enough to cover, so I will do it anyway.

So what is a basic sleeveless top? I am not sure what to call these anymore... but what I call a basic top is a simple but slightly fitted top that can come in any of the variations you see above, and many more. It can come in different lengths, be boxy or slightly flared; have different necklines... but what these have in common is the bust dart, no waist darts and no closures - it is slightly fitted, but still wide enough to pull over head.

For this pattern, starting with sloper, I will need to move the bust dart into an underarm position, add length (and some shaping) and reshape arm and neckline. Let's see how this one goes... 

10/7/11

Week 3:: Sleeveless top with neckline gathers: finished


Finished. It was not too bad. Gathering is always a little tricky for me, I try to do it by the book, but something always seem to happen. This time I had a hard time adjusting tension for the gathering stitch. It was either too loose or too tight.


It also took me a while to pick the fabric for this one. First of all, I vowed to use up my stash, as much as possible and not go out buying more. Until I absolutely have to. When there is no way around it. I tried to go with knits, then I got scared of the gathers and knits. I was looking at a fabric with larger pattern, but that did not seem right. Finally I decided on this striped cotton? I really am not sure whether this is pure cotton, or a linen mix, but it is very soft and thin and has a nice drape. It is a faded print and I really like the colors. A little different. I am a sucker for stripes and I have a few in my stash. But I never really know what to do with them after I bring the fabric home... except in my quilts. Anything goes there...


The gathers turned out fine, but since this is very light and thin fabric they are not so visible (just look at the muslin, see how nice they fall there). Making the neckline a little tighter, with more gathers would have fixed that, and/or using stiffer fabric. Or adding more fullness in the pattern for thinner fabric.

By the way - the black line on the bias tape matching the black line in the front - total coincidence. I also like how the lines in this pattern converge toward the neckline.


 I cut this one very similar to the muslin, except I included 1/4 in seam allowance for the arm openings because I decided to turn the bias tape inside. I also added a hem at the bottom.

I like this... I think I will reuse this pattern.

Some techniques you might find useful:
Facing or Detail: Bias Binding
How to make even gathers

Previous Week 3 posts:
Week 3:: Sleeveless top with neckline gathers
Week 3:: Sleeveless top with neckline gathers: drafting front
Week 3:: Sleeveless top with neckline gathers: drafting back
Week 3:: Sleeveless top with neckline gathers: fitting and pattern modification


10/5/11

Week 3:: Sleeveless top with neckline gathers: fitting and pattern modification

This is going to be a short post...
Again, I cut the pattern out from a sheet (this is probably the fourth or fifth one I cut from the same sheet. And I still have some left over. It cost $1.00.). Remember to add seam allowances if you create patterns with this method, because bodice patterns do NOT include seam allowances. In this case I used 1/2 in seam allowances on side and shoulder seams only. No seam allowances on neck and arm because I wanted to see what then would fit like when finished.

Before gathering...


After gathering.


Very nice, no? I was a bit skeptical about the neckline - when I blended the curve it looked a bit "wonky". But it looks very good with gathers.

I cannot see any problems with this - fits nicely in the front, in the bust section, and in the back. It is not too wide or too narrow. The only thing I will change is too widen the neck by 1 cm back and front (I tried it, and it was a little snug going over my head).

I know I am three garments into this project, but for now, It seems that no major modifications are needed once the pattern is drawn from the basic bodice. This is good, because that's exactly what I was hoping for. If you draw your own bodice, spend some time fitting it, you will be able to create designs that will too fit well. We'll see how it goes from now on...

Finally, let's finish this up...

Previous posts:


Week 3:: Sleeveless top with neckline gathers: drafting back

The back will be a bit less complicated. I promise.

Again, start by copying the back bodice and draw a new neckline.


Similar to the front, to add gathers around the neck we will move the shoulder dart into the neck and also add some volume around the neck. First, to move the dart, find A, which is at at the middle of the neckline. Draw a line from A to tip of shoulder dart.  Also, find B and C halfway from A to ends of neckline. 


Before we move the dart, trace from B to midline and then along the midline to the waistline. Also draw lines from B and C (for adding fullness) perpendicular to neckline.


This step should have been done before the lines we drawn, but OK. It will work. Cut out the shoulder dart, cut along the line from A to tip of shoulder dart and move that little piece of paper clockwise around the tip of the dart until you close the shoulder dart. This will open a new dart at neckline. Redraw the line from C.


Cut along lines from B and C until the edge but not through, so that pieces don't separate. Keeping the midline in place, open the pattern along cut lines by a desired amount. The more you open, the more gather you will get. I opened about the same amount (at neckline) as the moved dart. Trace along all the edges.


And this is what you get... (you don't need to trace along the cut lines, I did that only for illustration purposes).


Mark midpoints on traced edges along the neckline and connect them to blend the neckline curve.


That's it. Oh, don't forget the add length from waistline (I added 10 cm).


Just to make sure the neckline and arm opening curves are still smooth from back to front, align pattern pieces along the shoulder seam. Looks good.


And this is what the patterns look like. Now on to muslin...

Previous posts: