Showing posts with label dart manipulation. Show all posts

5/29/12

Challenge 15:: Gima tunic:: drafting front and back

Similar to the Challenge 14 top, I will enlarge the arm opening (personal preference) the same amount from the shoulder dart: 2/3 of the dart will be moved into the arm opening; 1/3 will go into the waist to add width (in Challenge 14 1/3 was incorporated into the yoke). 
OK, so mark points 1,2, 3 and 4 on the dart and draw a horizontal line from the dart end to the arm opening (point 6), and a vertical one to the hem (point 5). Trace around the pattern from point 1 counterclockwise to point 5. Put a pin in the tip of the dar and rotate the pattern counterclockwise until the right leg of the dart matches point 3 (we just closed 1/3 of the dart and moved it to the waist). Then trace from point 5 (on the pattern) counterclockwise around the pattern to point 6. 


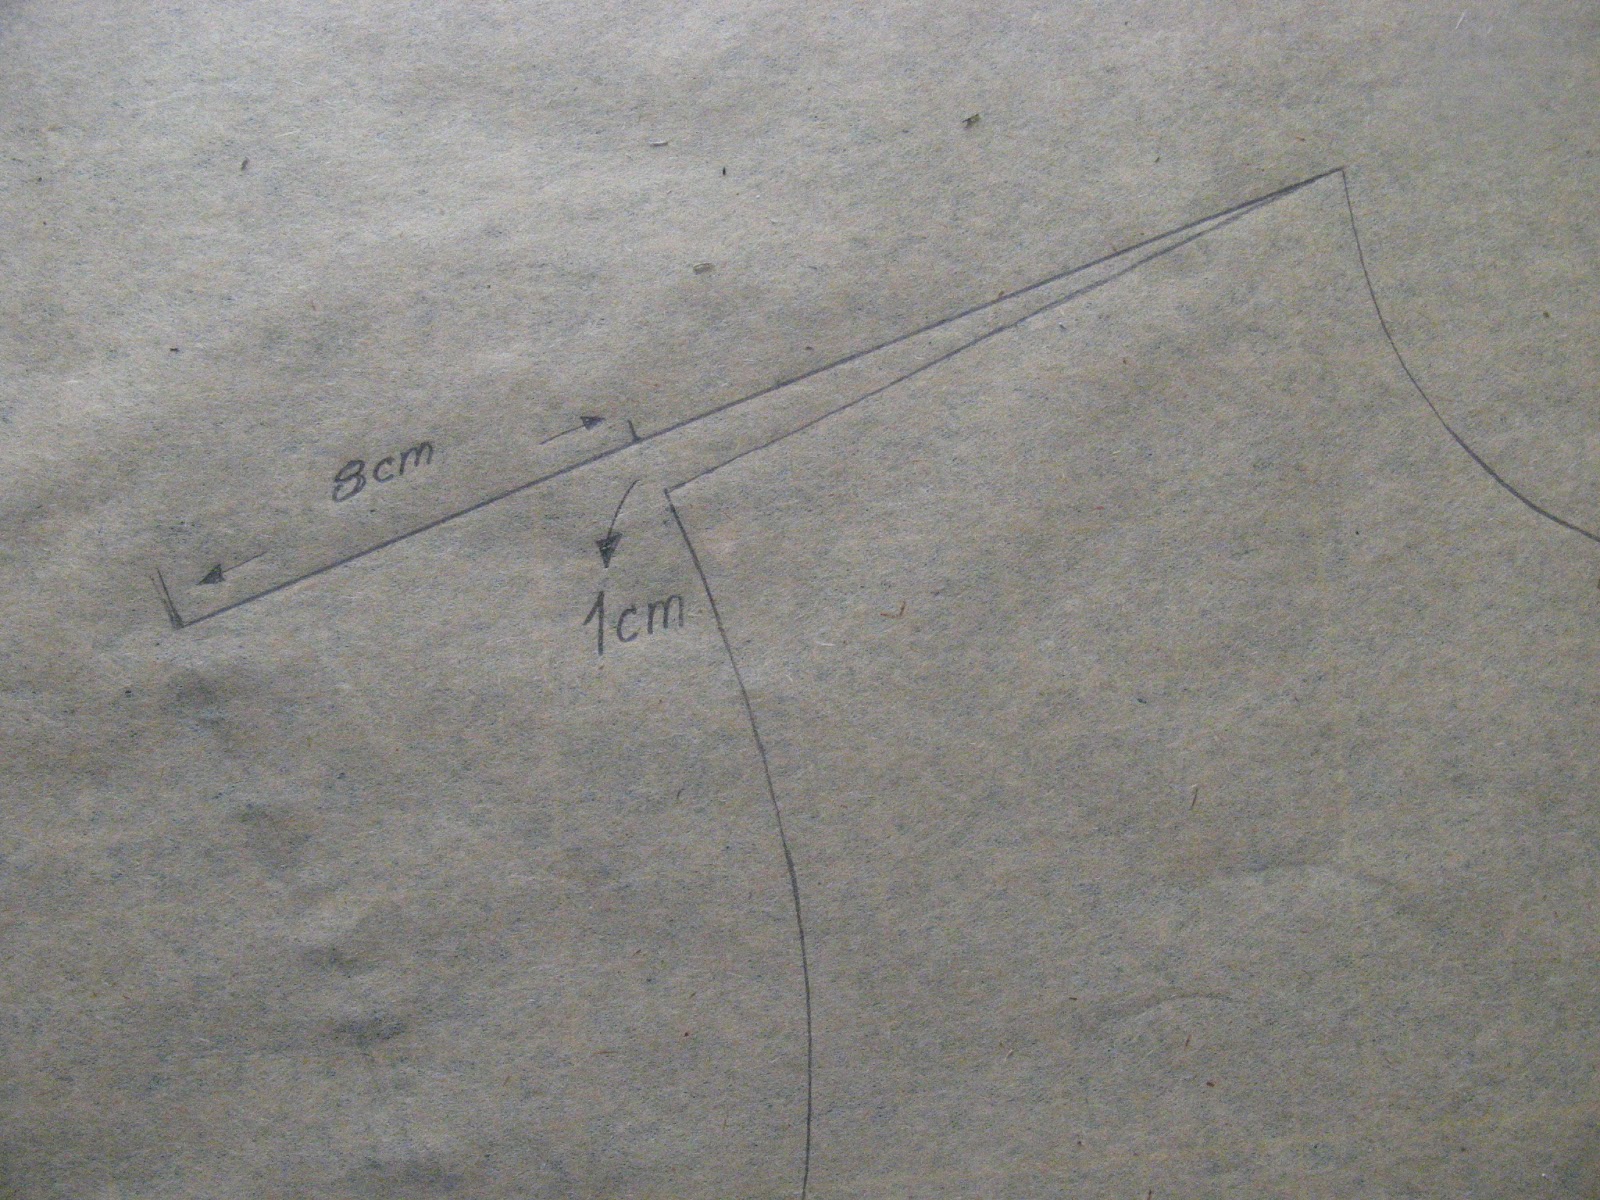
Finally, rotate the pattern until the right dart leg matches point 1. Trace around the last part of the pattern - from 6 to 1. Remove the pattern, redraw shoulder seam and the arm opening. I also took another 1 cm down the sideseam to further widen the arm opening.


Extend the length you wish - I added 45 cm from the waist - based on a red tunic I bought last year at Zara. Measure the opening of the dart - in my case this was 2.8 cm. We need this for the top because we will be moving a part of the dart into the waist there as well, and we need to keep the balance between the front and the back, so we need to know how much we added in the back.
Draw in your side seam. Here, I used the Zara tunic again. I really liked how it fit, so why not. Finally, draw in the hipline (about 20 cm below the waistline), if your top extends below the hipline, and make sure that the width is at least H/4 + 4cm, where H is your hip measurement. 


The last thing at the back, is to fix the neck opening. See below.


The front will be a little more complicated. We need to draw the neckline, and distribute the dart into the waist and under arm, so we will need to do some tracing as well as cutting, so first, trace your sloper (if you do not wish to modify it).
Neck opening first. It's a square opening, but a deep one, with an insert - it might remind you of a "bib" front? So why not incorporate the dart into the seam of the neck? I tried, but the opening and the insert turned out to be too wide for my taste, too much as a "bib" (not a fan). So I decided to just keep the dart and move it under the arm. 
This is how I drew the neck (let's try to keep it simple):
a) open the neck the same as in the back (point 2)
b) measure how deep you want the opening to be (that would be to the top of the insert, point 4)
c) draw a horizontal line from 4 and a vertical line from 2, intersection mark as 5
d) measure how deep you want the insert - in my case it's 10 cm from point 4; draw a horizontal line
e) point 6 lies 2 cm to the right of 5
f)to get the side of the neck opening, draw a line from 2, through 6 down to the bottom of the neck opening. 
g) draw the top of the neck opening (the top of the insert) a bit lower at the midpoint (maybe 1.5 mm) - point 9
h) finally, since this is a deep opening, we need to take a bit at the neck, to prevent it from gaping open: point 7 is about 3 cm to the right of 6; 8 is about 0.5 cm to the right of 7. Connect 7 and 8 to the breast point (BP). BP, 7 and 8 make a little "dart" that will be taken in and transferred somewhere else.

Now before we start transferring darts we need to draw in the sideseam. Also mark 1 cm down the sideseam for the arm opening to match the back. Almost forgot - draw another line from BP - down to the hem. Cut the pattern out. Cut out the neck dart we just drew in, also cut out the bust dart and cut along the line from BP down to the hem.


 This is the mess you end up with... Close the neck dart and secure with tape. Also tape the midline to the bottom paper, that part of the pattern will not move any more. Draw in where you want the underarm dart to be. Here - 6cm below the arm opening. Cut along this line.


Now comes the fun part - distributing the dart. First of all, leave some at the arm opening - this should match how much we added in the back (forgot to mention this earlier - go back to the back pattern and measure how much you added at the arm opening in the back by moving the shoulder dart). Tape to secure. Then open at the waistline - again match the back. Tape to secure. This will leave you with a dart under arm. 


All that's left is to do some fixes... redraw the arm opening - don't forget to take that 1 cm down the sideseam. Redraw the neck opening. Finish the dart.


Add the length, draw the sideseam (below the waistline), draw in the hipline and make sure that you have enough ease there - it should be H/4 + 5 cm at least (H is your hip measurement).


Finally, match the front an the back an the shoulder seam to check the neck and the arm curve.


That's it. Next will be the sleeve.

Previous Challenge 15 posts:
Challenge 15:: Gima tunic:: intro

5/13/12

Challenge 14:: Rossa shirt:: drafting back and front

Yes, I am still here... It's been a while, we had a Spring break (which seems it was just the other day, but it was a month since we've been back actually), then I was distracted by some quilting I just *had* to do, and then I was just, well... uninspired. So, instead of drafting and sewing I was playing around with some thing 'related' to this project. I was learning new tools for making fashion flats, I figured out how to make pattern pdf-s for printing more easily, I have been doing just a bit of fabric shopping and finally last week I have been doing some sewing.

OK, so let's get to this new challenge. A shirt - specifically this shirt below, Sydney Top from Steven Alan. It has a few interesting details - gathering around the neck (done that, should not be a problem), slit neckline (done that too, except this one comes with buttons so that will be interesting), yoke (done),  and a few new things - collar, shirttail hem with slits and shirt (relaxed) sleeves.
Steven Alan Sydney Top

This time, since the basic design is different from Block 1, which is more fitted, I will go back the basic bodice. Let's start with the back first.

In a nutshell - since this is a relaxed fit, I will make the arm opening wider as well. So we need to move the shoulder dart into the arm opening, draw in a yoke and do some other minor adjustments like the length, and the neck, side and hem shaping.

So, start with the back bodice: draw in a horizontal line from the tip of the dart - the position where the dart will be moved to, also the position of the yoke. Since I don't want to cut up my bodice, I will do the rotate and trace method. You could also do the slash and move method - cut along the drawn line, cut out the dart, close the dart and secure with tape...
To copy the pattern with the modifications... trace around your block from the left dart leg, around the neck, along the midline, waistline, up the side seam and along the arm opening until you reach the point where the line you drew touches the arm opening (you can also look here for a more detailed drawing).


Put a pin in the tip of the dart, and rotate counterclockwise until the right leg of the dart, touches the original position of the left leg (basically you are "closing" the dart). Now trace around the the top right corner of the bodice, the one you did not trace around in the previous step.


The picture below shows what you end up with. Since the shoulder line is not straight, fix it by drawing a straight line from the neck to the shoulder point. Also, divide the opening of the new dart into 3 equal parts. Two parts will be added to the arm opening, one part will be used for shaping of the yoke.


Now, add 1.5 cm to the width - this is a relaxed fir after all, and add as much length as you wish - in this case I added 24.5 cm from the waistline.


I also added 1cm to the shoulder width, dropping the shoulder slightly (again, the relaxed fit) and deepened the arm opening by 1 cm down the side seam. Draw a new arm opening.


Almost forgot - I deepened the neckline slightly. Personal choice, not really necessary. 


Draw a new hemline (here I used an old shirt I had; I liked the curve on it). Also, make sure that the width at the hip (of your shirt goes past the hipline) is at least H/4 + 2cm, where H is your hip measurement in cm. This is basically to make sure that there is enough room at the hip. For me, it worked out that I was right on the mark - I did not have to add any shaping to the side seam.


Finally, draw in the yoke: extend the horizontal line you drew in for the "new" dart - this will be the bottom of the yoke. For a bit of back shaping, and better drape, curve the back (bottom of the pattern) slightly so that the opening at the arm is about the same as the 1/3 of the dart opening.


OK, now on to he front part of the pattern. Since this one is more complicated, I first made a copy of it - on the copy I deepened the neckline a bit (see the pic below). I also measured the amount of the dart that will be blended into the arm opening. There is an error on the picture below - it should say 2A not A. If you look on an earlier picture above, the back dart was divided into three parts, and A is a "width" (measured at  the arm opening) of one part or 1/3 of the dart. 2/3, or 2A was blended into the back arm opening, so the same amount needs to be blended into the front arm opening to keep the balance between the front and back. The shaded part of the dart will be moved into the neck to get the gathers. There is a little bit of a "V" opening at the neck, so I took 1.5 cm at the neck opening and drew in the "V" down to about 6 cm from the bustline. Cut along that line.


Now, draw in the yoke - I chose mine to be about 4 cm from the shoulder seam. When we're done moving the dart, we will cut this out and tape it to the back yoke, to get one pattern piece. Then, divide the remaining neck into three equal parts (points A and B) and draw lines from those points to BP (bust point). I will do the rotation again, but you could also cut along those lines, cut the dart out and open equally at A and B.

Divide the dart to be moved (the shaded part) into two sections (points 1, 2 and 3). Trace from point 1 counterclockwise around the pattern all the way to point A. 


Put a pin in the tip of the dart and rotate the pattern counterclockwise until point 2 overlaps touches point 1. Trace the pattern from A to B. then rotate once more, until 3 touches 1 (now the dart is closed), and then trace from B around all the way to point 1.


This is what you end up with ... a very un-smooth neckline. So, smooth it. 


Add 1 cm to the shoulder length (to match the back) and deepen the armhole by 1 cm at the sideseam. Also, add 1 cm to the width, and the length from the waist to match the back. Draw a new arm opening. If the shirt extend beyond the hipline, make sure that the width at the hipline is at least H/4 + 3cm, where H is your hip measurement. Again, in my case I was straight on, so I did not need to do any side shaping. Shape the hemline - I used the same curve as for the back.


Since the neckline will be slit and there will be buttons we need to draw in the lapel. I chose it to be 2 cm wide, and to extend all the way to the waist. I used the actual buttons I will use of the shirt to mark button positions.


Finally, tape the front and back along the shoulder line, and check the neck and arm curve - make sure it is smooth along the shoulder seam; smooth if necessary - i needed to fix the neck curve - see below. Cut the yoke out and you have the basic three pattern pieces - front, back and the yoke.


2/14/12

Challenge 11:: Marina top:: drafting

So, in this Challenge, we are going to be modifying the Basic Block 1 (on the left) to get the pattern for the top on the right. 


As in the previous challenge, I printed and cut out the pattern for the Basic Block 1. There are two pieces, as shown below (remember, the pattern does not include seam allowances):


This time however, since we need to draft the french sleeve and move all the darts, instead of modifying these two pieces, we will trace them on separate piece of paper.

So, for the back (see the pic below on left), draw a line from the tip of the dart down to the hem. Place the pattern on a paper and trace from the shoulder dart (from the left dart leg) counterclockwise all the way to where the line from the dart hits the hemline. Then rotate the pattern counterclockwise until the right shoulder dart leg aligns with where you started to trace (where the left dart leg used to be). Then continue tracing from where you stopped (on the pattern) counterclockwise all the way around to where you started. This way you trace the pattern and move the dart at the same time. For more details see the Week 1 challenge.


Similarly in the front... Draw a line from the BP straight down to the hemline. Then trace clockwise from the top dart leg, around the pattern to the point where the line from BP hits the hemline. Then rotate the pattern clockwise until the bottom bust dart leg hits where you started tracing, or where the top dart leg used to be before rotating the pattern. Trace from the hem clockwise around to where you started. This was, as in the back, you moved the dart at the same time as you traced the pattern. More details in Week 1 challenge post (the only difference is the position of the bust dart, but everything else is the same).


Now the sleeves... In the front: redraw the shoulder from the neck point to about 1 cm above the shoulder point. Then extend by 8 cm (see pic below).


In the back: the arm opening is already wide enough, so just extend the shoulder line by 8 cm.


Then, drop the new shoulder point (the end of the shoulder seam) by 0.7 cm on both front and back and redraw and smooth the shoulder line as in pics below. Also, drop the under arm point (the start of the side seam) by 2 cm. I also moved the under arm point out by 0.5 cm, just to make the arm opening curve smoother at that point (where the under arm curve and the side seam meet). Then redraw the sleeve openings. This took a bit of trial and error. The french curve did not work, so I had to do this by hand. One important point, the sleeve curve should be perpendicular to the shoulder seam at the point where they meet. 


Finally - the neckline. I chose a V-neck, not too deep. I am not going to tighten it this time, because it is not that deep, or wide, and there will be the bow collar. Hope it works. So... measure 5 cm from the neck point on the shoulder seam, and 12 cm down the center line. Connect these two points with straight line. The neck curve should "go" about 1 cm to the left of that line, at about 1/3 of the length of the neckline (see pic below). This makes the V-neck lie flatter.


We will also need facing to finish this neckline so I drew it on this pattern too. When it comes to cutting the fabric, I will copy the facing on a separate piece of paper. I chose the facing to be 3 cm wide (remember, no seam allowances here). At the bottom of the V-neck, measure 3 cm and then curve the facing slightly to the tip (see pic above).

Finally, change the neckline in the back: 5 cm from the neck point on the shoulder, 3 cm down the midline. Also, draw in the facing.


Now you are ready to cut the patterns out and check the continuity of the neck and sleeve curves across the shoulder seam. As you can see, I had to redraw the back neck and facing a bit, but the arm opening were fine (not shown here).


Next... the muslin.

Previous Challenge 11 posts:

1/31/12

Challenge 10:: Editt:: drafting

So, in this Challenge, we are going to be modifying the Basic Block 1 (on the left) to get the pattern for the top on the right. 


As in the previous challenge, I printed and cut out the pattern for the Basic Block 1. There are two pieces, as shown below (remember, the pattern does not include seam allowances):


We will start with the front. First, redraw the neckline. I measured 4 cm from the neck on the shoulder seam and 9 cm down the midline. These numbers are arbitrary and you can choose your own... This time, I want the shoulder to be a bit wider than on the Ulla top, so I took just 1.5 cm off from the arm opening. 


Since this is another wide/deep neckline, I will tighten it as well. It is the same as for Ulla top last week: draw a line from the Bust Point (BP) to the new neckline at about 1/3 of the length of the neckline from the midline. Then measure 0.5 cm down, toward the midline and draw another line to BP. These two lines form a small "dart" that we'll cut out and close. 

Redraw the arm opening. You could have done it in the previous step. I just forgot.

Cut out the new neckline, arm opening, the bust dart and the new "dart" at the neckline. Remember to cut the dart to, but not through the BP. You don't want the two pieces of the pattern to separate.


Now move the smaller part of the pattern to the right, until you close the neckline "dart". Tape together. We just moved the neckline dart into the bust dart. This tightens the neckline, and widens the bust dart. Fix (smooth) the neck curve if needed.


Now the back... Reshape the neckline first. Move the neck point 4 cm down the shoulder seam, and deepen the neck opening by 5 cm (or choose your own values).


Now the dart... We will move it into the hemline, same as for the Ulla top. So, draw a line straight down from the tip of the shoulder dart to the hemline. Cut along that line to, but not through the tip. Cut out the shoulder dart. Put some paper under the pattern, and close the shoulder dart as you wish... depending on how much flare you want to add along the hemline. This time I opened it about 3cm (measured at the hemline). I will simply ignore the remaining shoulder dart and blend it in the design. Tape to the paper below to secure and cut out.

Next, align the front and the back, such that neck openings match. Tape together. Redraw the back arm opening and fix the neck curves, if they are not smooth across the shoulder seam. Then draw a line 5 cm away from the neck seam line, parallel to the seam line, on the front pattern. This will be the "yoke". It's not really a yoke, since it will be a part of the back pattern, but I don't know what else to call it. Cut along that line.


Back to the front pattern. Now we will move the bust dart into the shoulder seam (the new shoulder seam or the "yoke") to get the gathers. (I did the same thing in week 6) So... draw a line from BP to the middle of the shoulder seam (point 1) and then measure about 1.5 cm on each side of 1 to mark points 2 and 3. I placed * marks about 1 cm away from points 2 and 3 - you will be gathering between those points. Cut along the lines from 1, 2 and 3 to BP (but not through). Now place some paper under the shoulder part of the pattern and close and tape the bust dart. Fan out the cut out pieces evenly and tape to the paper below. Reshape the shoulder seam and cut out.


And now for the front gathers... We need to add some width at the midline. Mark * at the desired distance from the midline. Make sure that it is on the flat part of the curve, otherwise your neckline might not keep shape after gathering. In my case, * is 2 cm away from the midline. I will add 3 cm to the width - in other words move the midline 3 cm to the right. I was a little lazy, and did not actually add it to the pattern. I will add it when I cut the fabric - I will simply move the "old" midline 3 cm away from the fabric fold.

The * mark is also important for finishing the neckline. In my case, after gathering, the distance between * marks will have to be 4 cm. That way I will know that I have the same neckline after gathering... (this is a sneak peak of the fabric I will be using!)


And that's it. This is what front and back look after all the modifications (well, except the added width in the front). I just noticed I will have to smooth the arm curve on the back a bit more.. it's not smooth across the original shoulder seam.


Next: muslin...

Previous Challenge 10 posts: