6/18/12

Challenge 15:: Gima tunic:: finished

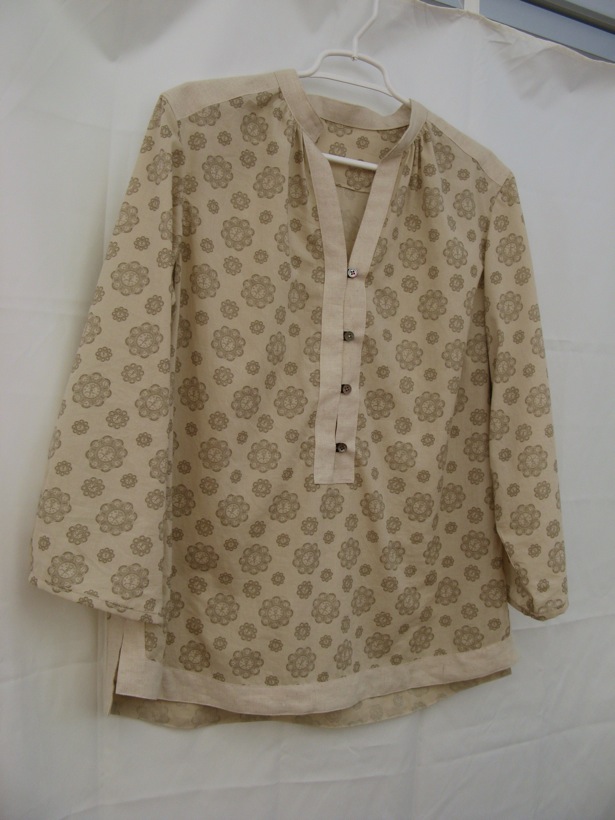
This is Gima tunic. For those that have not seen the intro post for Challenge 15, it's the sketch on the right, the one without the pockets.

It turned out a little bit different but I really like it. I wore it all day today, and it was really, really comfortable. 

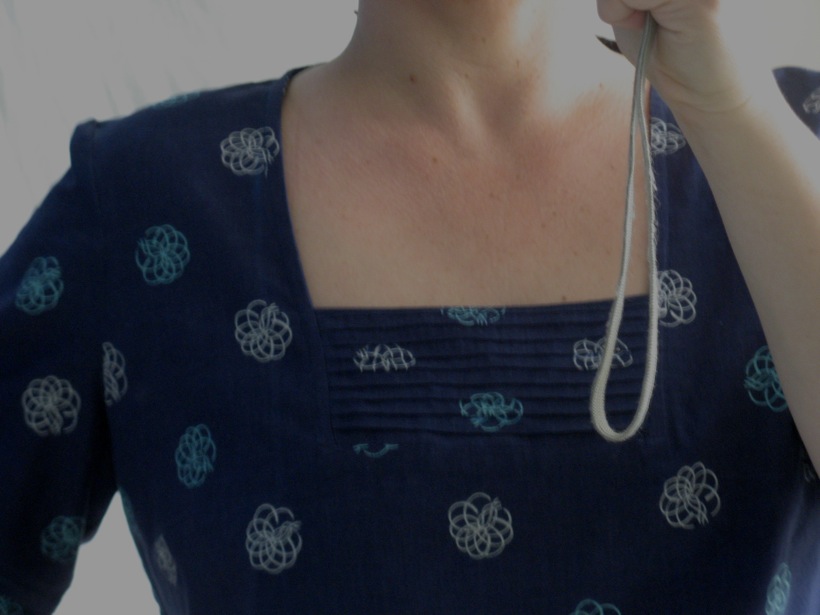
The pics with me modeling the tunic are really bad, I know. I do need that tripod that has been mia for a while now. In the picture below I look like I have big bust, when I really don't - not that there is anything wrong with big bust; it's just really hard to take a picture holding the camera like this...


The tunic turned out a bot different than the sketch. For one it has more of an A-line, and I did not do hem pintucks. The fabric was too thin and I think that was the reason I had hard time keeping the tucks straight and parallel. Another reason was that the hem turned out to be a little curved - because of the A-line, and I didn't want to have make tucks on a separate strip of fabric (like I did for the sleeves) and add it on. Oh, and I wouldn't have enough fabric anyway. I could barely get these pieces as is.

Also, with the A-line, this top has more ease than in the sketch, making it more loose and really comfy.


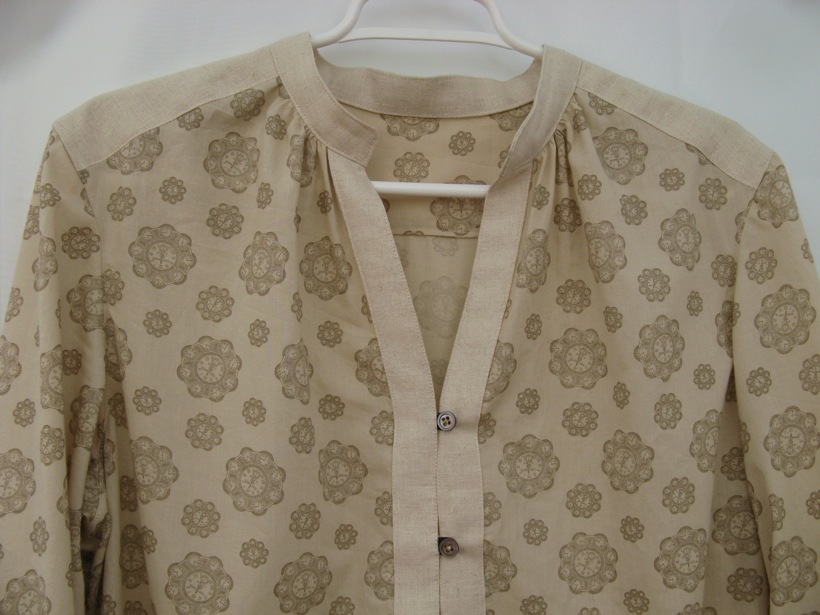
The closeup of the tucks in the front. I had a little "duh" moment here, almost had to do the tucks panel all over again (and I do not like to make mistakes; I do not like to have to redo things). When I cut the front, I cut it with the panel, I never really made a pattern for it. I thought I would leave the panel in (not cut it out) at first, to make sure the neck sits nicely. Then I would cut out the panel and use that as a template for the pintucked, finished panel. Well, I miscalculated the seam allowance, so instead of my usual 1/2 in, I ended with a 1/4 in. Almost wasn't able to fit it. The workaround was to use 1/4 in seam allowance which made the neck narrower by 1/4 in on both sides, but luckily that wasn't a big deal.


This is just to show you how nice and flat it sits on the chest. I didn't use any stabilizer on the panel. The pintucked, front piece was a little stiffer because of the tucks, and then I added the back to it, and it turned out stiff enough. Neck is finished with a bias tape.

(I need a bit of a tan)


And finally, the sleeves. Another "duh" moment. Well, sort of. When I drafted and cut the muslin, I did not take any width at he sleeve opening. It was simply straight. I though I would take it in after I make sure the sleeve fit well. I kinda forgot. So I cut strips for the pintucked part, made them as lond as I wanted the opening of the sleeve to be, and added some gathering to narrow the sleeve. Like a cuff, really. It turned out to be a nice little detail. However, when I do the other version of the tunic (sketch on the left) I will do a long sleeve, and then I will make a sleeve narrower at the opening.


Things will be quiet for a while here. School is done, and we are taking some time off to visit our family in Europe, so we'll be away until mid August. Then I will be back with more drafting. 

Previous Challenge 15 posts:
Challenge 15:: Gima tunic:: intro
Challenge 15:: Gima tunic:: drafting front and back
Challenge 15:: Gima tunic:: drafting sleeves, muslin


6/17/12

Challenge 15:: Gima tunic:: drafting sleeves, muslin

For this top I wanted a narrower sleeve, but not too narrow. I don't really care for narrow sleeves myself. I have a really wide back (always had, no matter what size I was) and I need that additional room in the sleeves. Otherwise tops are always tight around my upper back if I move my arms and I absolutely hate that. So, not so tight, but narrower than the Rossa shirt.


So, I used the same method to draft the sleeve as for Rossa shirt, except that I used a higher sleeve cap (see picture above -> sleeve cap is 2/3 of AB; Rossa shirt sleeve had 1/2 AB) and I drew the sleeve closer to the bodice - this might be clearer from the picture below (this is the back).


Compare the above picture with the one I did when drafting Rossa shirt sleeve - the difference is that when you extend the shoulder line by 8 cm, you draw down 4 cm, instead of 2.5. This will make the angle of the sleeve bigger and the sleeve "closer" to the bodice. Then you draw the sleeve curve the same


Repeat for the front, same as the Rossa shirt, with modifications as for the back. 


This is what the sleeve looked like after the first draft. I thought that the front lookes a bit too low, so I adjusted the curve a bit.


This is the final pattern for the sleeve. 


I was feeling confident about the bodice part of the pattern, so I cut it out from the fabric I chose for this tunic, not the muslin. I figured I might have to take it in a bit, but it shouldn't be too tight. And I was right. It was too wide, so I took it in a bit and shaped it a little more at the waist. 


I was a bit worried about the sleeve though. It looked a bit weird, the pattern. But look here, it fit just perfect!


So now onto the finished top...

Previous Challenge 15 posts:

5/29/12

Challenge 15:: Gima tunic:: drafting front and back

Similar to the Challenge 14 top, I will enlarge the arm opening (personal preference) the same amount from the shoulder dart: 2/3 of the dart will be moved into the arm opening; 1/3 will go into the waist to add width (in Challenge 14 1/3 was incorporated into the yoke). 
OK, so mark points 1,2, 3 and 4 on the dart and draw a horizontal line from the dart end to the arm opening (point 6), and a vertical one to the hem (point 5). Trace around the pattern from point 1 counterclockwise to point 5. Put a pin in the tip of the dar and rotate the pattern counterclockwise until the right leg of the dart matches point 3 (we just closed 1/3 of the dart and moved it to the waist). Then trace from point 5 (on the pattern) counterclockwise around the pattern to point 6. 


Finally, rotate the pattern until the right dart leg matches point 1. Trace around the last part of the pattern - from 6 to 1. Remove the pattern, redraw shoulder seam and the arm opening. I also took another 1 cm down the sideseam to further widen the arm opening.


Extend the length you wish - I added 45 cm from the waist - based on a red tunic I bought last year at Zara. Measure the opening of the dart - in my case this was 2.8 cm. We need this for the top because we will be moving a part of the dart into the waist there as well, and we need to keep the balance between the front and the back, so we need to know how much we added in the back.
Draw in your side seam. Here, I used the Zara tunic again. I really liked how it fit, so why not. Finally, draw in the hipline (about 20 cm below the waistline), if your top extends below the hipline, and make sure that the width is at least H/4 + 4cm, where H is your hip measurement. 


The last thing at the back, is to fix the neck opening. See below.


The front will be a little more complicated. We need to draw the neckline, and distribute the dart into the waist and under arm, so we will need to do some tracing as well as cutting, so first, trace your sloper (if you do not wish to modify it).
Neck opening first. It's a square opening, but a deep one, with an insert - it might remind you of a "bib" front? So why not incorporate the dart into the seam of the neck? I tried, but the opening and the insert turned out to be too wide for my taste, too much as a "bib" (not a fan). So I decided to just keep the dart and move it under the arm. 
This is how I drew the neck (let's try to keep it simple):
a) open the neck the same as in the back (point 2)
b) measure how deep you want the opening to be (that would be to the top of the insert, point 4)
c) draw a horizontal line from 4 and a vertical line from 2, intersection mark as 5
d) measure how deep you want the insert - in my case it's 10 cm from point 4; draw a horizontal line
e) point 6 lies 2 cm to the right of 5
f)to get the side of the neck opening, draw a line from 2, through 6 down to the bottom of the neck opening. 
g) draw the top of the neck opening (the top of the insert) a bit lower at the midpoint (maybe 1.5 mm) - point 9
h) finally, since this is a deep opening, we need to take a bit at the neck, to prevent it from gaping open: point 7 is about 3 cm to the right of 6; 8 is about 0.5 cm to the right of 7. Connect 7 and 8 to the breast point (BP). BP, 7 and 8 make a little "dart" that will be taken in and transferred somewhere else.

Now before we start transferring darts we need to draw in the sideseam. Also mark 1 cm down the sideseam for the arm opening to match the back. Almost forgot - draw another line from BP - down to the hem. Cut the pattern out. Cut out the neck dart we just drew in, also cut out the bust dart and cut along the line from BP down to the hem.


 This is the mess you end up with... Close the neck dart and secure with tape. Also tape the midline to the bottom paper, that part of the pattern will not move any more. Draw in where you want the underarm dart to be. Here - 6cm below the arm opening. Cut along this line.


Now comes the fun part - distributing the dart. First of all, leave some at the arm opening - this should match how much we added in the back (forgot to mention this earlier - go back to the back pattern and measure how much you added at the arm opening in the back by moving the shoulder dart). Tape to secure. Then open at the waistline - again match the back. Tape to secure. This will leave you with a dart under arm. 


All that's left is to do some fixes... redraw the arm opening - don't forget to take that 1 cm down the sideseam. Redraw the neck opening. Finish the dart.


Add the length, draw the sideseam (below the waistline), draw in the hipline and make sure that you have enough ease there - it should be H/4 + 5 cm at least (H is your hip measurement).


Finally, match the front an the back an the shoulder seam to check the neck and the arm curve.


That's it. Next will be the sleeve.

Previous Challenge 15 posts:
Challenge 15:: Gima tunic:: intro

5/22/12

Challenge 15:: Gima tunic:: intro

For Challenge 15 we have a tunic, or a dress, depending on how you look at it. The inspiration for this challenge comes from Boden tunics. I like a lot of them, too many to post here, so here is just one example - Notch Neck tunic.

I am planning for a slightly different top: deep square neck with a pintuck panel, elbow length sleeves and some additional pintuck details on the sleeves as well as the hem (we'll see about the hem). I originally made the sketch on the left, but since I am using a patterned fabric, I thought the additional seams would be too much - and I am NOT going to do any pattern matching. Also, the fabric is a little transparent so pockets like these wouldn't fit well. But I am going to make that one out of a solid chambray I have in my stash. So here I will be drafting the simpler version - the sketch on the right.

Also, most of all (woven) Boden tunics have side zippers, so they are probably more fitted - my version will be a pull-over.


You may have noticed that my sketch looks much better than in some previous challenges. I can draw a nice arm opening curve, but if I have to sketch a blouse it looks terrible, all out of proportion. So I used a fashion form (or a croquis). That's one of the things I have been researching while on a hiatus from this project. I looked into a number of forms, free downloadable ones. There are many to choose from at the Design Nexus, there is a croquis family over at the Threads Magazine, but I finally settled on the Fashionary templates. The outline prints very faintly, so you can draw over it, write over it and it does not stick out. I am actually ordering their sketchbook, I think it could be very useful

Now on to drafting the back and the front.

5/15/12

Challenge 14:: Rossa shirt:: finished

Here it is... On the right the inspiration (Sydney top from Steven Alan) and on the left my finished Rossa shirt.

I planned to take some shots of me wearing it this time. I really did. But I could not find my tripod... I haven't used it for so long. Next time, I promise.

The fabric comes from the local Fabric Planet and was bought very recently. I have to say it looked better in the shop than when I actually cut it.


It looked to busy so I used some stash linen for contrast. I was debating using darker linen, to match the print (which is actually not flowers but clocks!), but the effect was - well, dark and drab. So I ended up using this lighter linen and I have to say I like the result.


I wish I could show you what it looks like on, but the pattern modifications I did made a difference. It looks really good with skinny pants... probably would with a skirt too, but I haven't try that.


The collar ended up perfect - no need to do any modifications. And it was really easier to put on than I have expected (not having much experience with collars). And the neck gathers add a nice little detail.

I did not know what exactly to do with the sleeves, so I simply used some bias tape (actually it wasn't cut on bias, I didn't want it to be stretch) and finished the end. 


Buttons gave me some grief. These are small buttons, so I was not going to make the loop out of fabric - too small. I didn't have time to go to the store, I needed to finish this (and adding these loops was actually the first step that needed to be done, so I couldn't put it off), so I ended up using some dark thin elastic I had on hand. Ended up being a little too thick, so it's wrinkling the fabric a little around the buttons. I definitely need to use something different next time.


All in all this was fun to make. Both pattern drafting and sewing (as I mentioned before, cutting fabric is not my favorite thing). And it wasn't that difficult too. I started from the basic sloper and a few modifications later I had this pattern. When you think about how much you modify finished patterns that don't fit - I think this is not too bad.

As a side note... this fabric made an appearance on another blog this week... it was made into a very different top. Go and check out at Cation Designs.

Previous Challenge 14 posts:


Challenge 14:: Rossa shirt:: muslin and modifications

So... here is the muslin. Again, thrifted sheets came in handy. Cutting the fabrics is not my favorite thing - unlike cutting for quilts which I find therapeutic - so I decided not to cut  the collar or the button placket. I just wanted to try the overall fit. I was actually pretty confident I will not have any major problems, as in previous challenges, and I decided to wing it with the collar - which is one thing I haven't done before. And, the collar can be easily redesigned without the need of changing any other pattern pieces.

It really did fit well. Not perfect though. I found it a bit too short and hem, well, a little bit boring. The sleeve was too long but fit very nicely. The neckline was fine. I did find it a bit boxy, so I decided to taper it in slightly at the waist - this is a loose fitting shirt after all. And to lengthen it a bit and add a bit more width at the hip - not that it was tight or anything, I just thought it would fall more nicely. That's about it. I had no idea how to finish the sleeve at this point, I just knew it would be long...


So, in the front, at the waist I took in as much as I added originally, so that it was as wide as the basic sloper. I added 2 cm at the hip and lengthen the front by 1 inch. I also decided to have a little opening on the side - 10 cm, so I drew that in too.


Instead of simple hem finish, I decided to do a decorative band along the hem, so I drew that in too (in red) - I later copied that part because it will be cut separately.


In the back, same as in the front, I made the waistline as wide as the basic sloper and then I added 1 cm at the hip. I added 2 more inches to the length to make the back a little longer than the front. To match the side opening, I matched the front and back pattern pieces - see pic on the right below.


I copied the hem piece on both front and back...


And when I finally cut all the pieces out this is what I had...


And now onto the finished piece...

Previous Challenge 14 posts:

5/14/12

Challenge 14:: Rossa shirt:: drafting sleeve and collar

Without any introductions...

The collar... Measure the length of the neck at the back and the front. This will be half the length of the collar. Choose the with and draw a rectangle with those two measurements. See picture below. To draw a curve, find points 4 (about halfway between 2 and 3, and 5 (about 1.5 cm up from point 3). Finish drawing the collar as in the pic below. Point 2 will be your shoulder seam mark.


Take your patterns and just make sure that point 2 actually matches the shoulder seam, by 'sliding' your collar pattern from the back seam toward the shoulder seam.


Here I will be drawing a shirt sleeve (as per Bunka Fashion Series Garment Design Textbook 3 - Blouses and Dresses) which is wide due to the small sleeve cap, and has no ease. This is appropriate for relaxed fit garments with deeper arm opening.

OK, so first, let's figure out the sleeve cap height. copy the arm opening curves for the back and the front next to each other - see the picture on the left. Draw a vertical line from the sideseam up. Draw horizontal lines from the shoulder points toward the vertical lines (points 1 and 2). Find point A halfway between 1 and 2. Measure distance from A to B - half that distance will be the sleeve cap height (C is halfway between A and B; distance from A to C is the sleeve cap height).


Now take some tissue paper, or other transparent paper you might use, and put over the drawing in the previous picture. You need to be able to see the arm opening curve clearly. First, lets do the back. 

Extend the shoulder line by 8 cm and then draw a 2.5 cm long line perpendicular to that line. This will give you the angle at which the sleeve is drawn against the back bodice pattern, see pictures below. Connect the triangle and extend by sleeve length (from the shoulder point at the shoulder seam). Next, measure the cap height from the shoulder point. Draw a perpendicular line. This is the line that will be the widest point of the sleeve, right at the bottom of the sleeve cap. 

Now, draw the sleeve cap curve. Its not as bad as it seams. Start at the shoulder seam; go a bit over the arm opening curve; touch the arm opening curve at about 1/2 length of the arm opening and then curve down to that line you drew for the sleeve width. make sure that the length of the arm curve from 1 to 2 is about the same as the length on the sleeve cap from 1 to 3. Again, there is no ease on this sleeve, but you do want to make sure that the sleeve cap is not shorter than the arm opening on the bodice.


Finally, draw the hemline of the sleeve, parallel to the sleeve with line and connect to point 3. I made the "hem" a bit narrower - by 1/4 of the whole width. 

Repeat the same for the front part of the sleeve with one modification. The front sleeve cap curve needs to be a bit deeper than the back, so your sleeve cap will go slightly above the arm opening first, then cross below about halfway from the shoulder to the point that corresponds to point 1 on the back (at the same height from the top of the side seam). Finish as for the back.


Finish the sleeve as for the back. I took in the same amount at the hem as for the back.

Cut the two pieces out and tape them together. I did not cut all the way to the sleeve cap curve, just in case it needed to be adjusted. It did, a bit (ignore the double curve in the back, I actually miscalculated the sleeve cap height fist time around).


Finally, point 1 will be used as a marker for fitting the sleeve, so mark those on the sleeve and on the bodice patterns.


In Challenge 7 I used a different method of drafting sleeves (from the same book) - I drafted a tighter sleeve with a height sleeve cap; and another wider, with smaller sleeve cap. You could also use that method to draft a sleeve for this shirt.


Previous Challenge 14 posts:
Challenge 14:: Rossa shirt:: drafting back and front